Tuesday, 22 April 2014

Nutty Quinoa Power Lunch!


Hello all! 

So sorry for the silence for the past couple of weeks. I have got a new job and with that some hours that take some getting used to. So my precious kitchen hours have been put on hold, but its all for the greater cause of being able to make a living, right!?

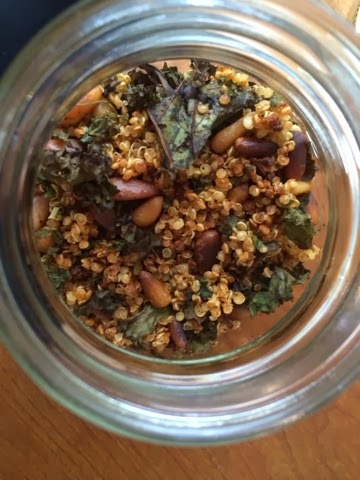
Anyhow, I have snuck in a few hours finding some yummy things for you all to try. This for example is my nutty quinoa and vegetable salad. So good, so gluten & dairy free and so vegan! I hope you all enjoy! 

Ingredients

1 cup cooked quinoa (white, red or black)
1 large broccoli
2 carrots
1 zucchini
1 pack green beans
1 handful brazil nuts
1 handful walnuts
1 handful pecan nuts
2 Tbs chia
3 Tbs black sesame seeds

Dressing 

1/3 cup Olive Oil
5 Tbs Tamari Soy
2 Squeezes of Agave (to taste)
1 cm of fresh ginger grated
3 Tbs Rice Vinegar

Method

Chop the raw (washed and dried) broccoli, carrots and (peeled) zucchini into small cubes. Steam the beans for a few minutes then immediately pour cold water on them and chop them into smaller pieces with the other vegetables. Feel free to add whatever veggies you have lying around your fridge. Add the vegetables to a large bowl and add the quinoa. Chop the nuts finely or add them to your Vitamix or blender and blitz quickly till they are in smaller pieces. Add them to the quinoa and vegetables. Last drizzle the chia and sesame seeds on the mixture. 

In a separate bowl add all the dressing ingredients. Be careful here and add as much as you like depending on your own taste and preferences. I adore ginger so I tend to use a lot of it. The agave is just to balance it all out. However, skip it entirely should you be on a no sugar / sweet diet. 

Note: I use no salt in this recipe and if you want to, then try and stick to himalayan salt it contains minerals and has health benefits. 

Add the dressing to the quinoa and place in the fridge for 2 hours. Serve on its own or with salmon! 

Enjoy x


Tuesday, 11 March 2014

Guilt and Gluten Free Banana Bread with Dark Chocolate Chips

Hello all!
 So I have gotten my bake on and always wanted to try a gluten free version of banana bread. Now as I am a total chocolate addict I simply HAD to add the choc but it is easily removed. If you use dairy free chocolate the recipe becomes vegan as well. Its a win - win recipe. This is perfect for freezing as well and just wrapped in baking parchment and stuck in the toaster for when you have people over for tea! Or just eat the whole thing... although I would not recommend that to anyone. 

Happy Banana Bread Baking!

Ingredients

2 Cups Gluten Free Flour
2 Tsp Baking Powder
2 Tsp Baking Soda
1 Tsp salt
1 Tsp Xantham Gum (unless you are using all purpose flour which already contains the gum)
3 Tsp Cinnamon
1/2 C Rapeseed Oil / Coconut Oil
2/3 C Agave Nectar/ Maple Syrup
2/3 C Almond Milk
1 Tsp Vanilla Extract
3 Ripe & Mashed Bananas
1/2 C Walnuts
2 C Dark Chocolate Chips (use dairy free if you can)

Method

Preheat the oven to 165 c. Lightly coat a loaf tin with oil. I chose Coconut Oil. Whisk all the dry ingredients together. Then carefully add the oil, agave, almond milk & vanilla to the mixture. Use a spatula to fold in the mashed bananas and chocolate chips and walnuts. Make sure they are combined well and pour over to the loaf tin. Bake in middle of oven for 35 mins. Check that it is well done by putting a toothpick in it and if it comes out clean its done. 

Enjoy!


Friday, 7 March 2014

Layered vegetable terrine! For when you want to impress guests!

I saw a recipe for this somewhere on Pinterest, skipped the recipe part and just looked at the pictures and thought I should try it. Now I just used what little I had in my fridge so it's rather short stacked, but will add lots more yummy veggies next time! This is perfect to serve to guests, that you want to impress. The best part is that you just add vegetables to your taste and preferences! Now mind you this is my first attempt so will get better with practice but so far I'm rather happy! Perfect if you are a looking for a quick lunch option as well. Best way to get rid of all your left over veggies on Sunday and refrigerate and eat for the beginning of the week.

This recipe is for the one I made, feel free to use more or add other things using your imagination! That's what cooking is all about!

Ingredients

1/2 bag spinach leaves
4 stalks of fresh Basil leaves
1 avocado
1 red pepper, cut longitudinally
1 yellow pepper
126 g goats cheese
8 small potatoes thinly sliced into rounds
2 celery stalks
1 small yellow onion
1 clove garlic
2 tsp coconut oil
1 tsp curry powder 

Method

Pre heat your oven to 200 c. 

Line a loaf tin with plastic foil. Chop the celery, onions and garlic finely. Heat 1 tsp coconut oil in a frying pan. Add the curry powder and then the celery, onions and garlic. On medium heat cook till soft. Remove from heat and set aside in a bowl to cool. 

In the same pan heat the other tsp coconut oil and add the peppers. Cook on low heat till soft. Wrap in kitchen roll to absorb the remaining moisture. Set aside

Place the spinach and basil in the frying pan and heat gently till reduced. Wrap in paper when reduced and squeeze out all moisture. Let cool. 

Cook the potato slices on a baking tray in oven for roughly 15 mins or until golden. Set aside and cool. 

Layer the terrine. Make sure you alternate colours! I added the spinach and basil first, then the peppers, then the fresh avocado which was thinly sliced, then crumpled goats cheese, celery and onion mixture and last the potato. 

Place baking parchment on the top and weigh down with things you have I'm the fridge. I placed cans on top. Refrigerate for min 8 hours. Overnight is best!

Just pop it out of the tray using the plastic foil as guidance and turn upside down. Viola! 

Delicious! 


Enjoy! 


Monday, 3 March 2014

Delicious Quick And Simple Lunch Pasta

Lunch during the weekdays are usually forgotten or rushed. It's rather simple. Plan ahead. The night before just make a double batch for dinner, and save the leftovers for lunch. It's rather anti-social eating leftovers at your desk everyday but if you aim to eat homemade twice a week thats better than the processed sandwiches, salads and other food stuff you tend to grab in a hurry. This is a delicious recipe, so simple and so lovely. It even tastes better the day after. 

Enjoy!

Ingredients:

Serves 1 -2 

1 Zucchini, Finely chopped
1 Carrot, Finely chopped
1/2 Red Onion
Handful Chopped Chives
Himalayan Pink Salt ( to taste )
25 g Goats Cheese

Optional: Parmesan to Garnish.

Method:

Lightly heat the coconut oil in a large frying pan. Add the carrots, zucchini and onion. Cook till soft, and add the chives, vinegar and crumble in the goats cheese. Let sit for a few minutes on low heat. Stir occasionally. 

Bring a pan of water to boil and cook the pasta for 8 mins. Drain and rinse well. 

No oil needed, just add the vegetables to the pasta and serve immediately. Add Parmesan should you wish. 

Alternatively you can use quinoa instead of pasta if you are avoiding starch-rich foods. Brown Rice Pasta is a great alternative to ordinary wheat pasta, it doesn't leave you feeling heavy and bloated afterwards. However, with everything, if you eat too much even gluten free pasta, will make you feel bloated so watch your portions and ingredients carefully. 


a little bowl of heavenly simple pasta


Saturday, 1 March 2014

Gluten Free Pizza. Just because. And just because its so good!

Happy Weekend all my lovely green leaners!
I hope everyone has had a great week, I know I have! Full of energy and happiness. I am sharing a lovely recipe today. Pizza. The source of life! Yumazing. What better comfort food than this? Like all my recipes, feel free to adjust and tweak as you feel would suit your diet better! 


Ingredients

1 dl = Roughly 1/2 Cup.

2 dl Soy Flour
2 dl Rice Flour
2 dl Potato Flour
1/2 dl Psyllium Husks
1 Tsp Salt ( Preferably Himalayan Pink Salt)
42 g Fresh Yeast
50 g Room Temperature Butter
3 1/2 dl Water

Method

Combine all the dry ingredients and add the water, yeast and butter. Knead for a few minutes, till dough like. Let it rest in the bowl for 30 mins. 

Pre heat your oven to 250 C. Place a baking tray in the oven and heat. 

Part the dough and shape into pizzas. Chose your thickness, or thinness. Add preferable toppings. Brush the baking tray quickly with coconut oil, before placing the pizzas. Place in the oven for 10-15 mins or until the crust is golden and toppings are cooked. 

Enjoy!


Tuesday, 25 February 2014

Friendly Fibre Gluten Free Bread


The other day I played around with the recipe I already had for bread. I wanted to make it more fibre rich plus add some chia. So this is what I made and boy oh boy does this recipe make for a lovely loaf of bread. Its incredibly easy to make and very versatile, perfect toasted. This bread is not suitable for lactose intolerant people or vegans.

Friendly Fibre Gluten Free Bread

1 dl = roughly 1/2 Cup

Ingredients

1 1/2 dl Buckwheat Flour (make sure it is Gluten Free as some are gluten contaminated)
1 1/2 dl Rice Flour
1 dl Linseeds (I use Golden Linseeds)
1 dl Pumpkin seeds
1 dl Sunflower seeds
3 Tbs Chia Seeds
1/2 Psyllium Husks
1 Tbs Bicarbonate
1 1/2 Tsp Salt
1 Pinch Cumin
2 dl Natural Yoghurt
4 dl Milk
1/2 dl Agave
1 Tbs Olive Oil
1 Egg white

Method

Pre heat your oven to 250 c. Mix the dry ingredients, in a bowl. Combine well. In a separate bowl combine the wet ingredients. Add the wet ingredients to the dry ingredients and transfer the mixture into a loaf tin. Make sure you have oiled the loaf tin. Add more sunflower and pumpkin seeds on the top.

Place the tin in the oven and decrease the heat to 180 C.

Bake for 1 hour.

Once done let cool on a wire rack and serve whilst warm.

Delicious to toast as well.

Enjoy!


Saturday, 22 February 2014

Crazy good Almond salad

Imagine the most delicious tuna salad. Salivating? Now take away the tuna and replace it with Almonds. Huh? I know, sounds odd. But trust me when I tell you this is truly one of my new favourite things to eat. The next time I am throwing a dinner party I am serving this. So all my friends know already, this is your welcome nibble. Amisa does this gluten free crisp bread which is heavenly and served with the almond salad on top is just too darn good. 

Almond Salad / Spread

Ingredients
1 Cup Raw Almonds
2 Celery Sticks, Finely chopped
2 Shallots , Finely chopped
1 Small clove garlic, Finely chopped
4 Small Spring Onions, Finely chopped
2 Tbs Organic Dijon Mustard
1 Tsp Himalayan Salt

Method

In a bowl soak the almonds in water overnight. Keep in the fridge. At least 3 hours. Let them plump. Rinse and drain well. Place in powerful blender and blast till flaked and looks almost like "tuna".  Add the rest of the ingredients and mix well. Add or reduce salt to taste. Alternatively you can add 1/2 granny smith apple finely chopped. 

Chill for 2 hours and serve. It keeps well for a week in the fridge but there is no way it will be there that long!! 

Enjoy (I know I did :)


Friday, 21 February 2014

Traditional Pad Thai Gluten Free

When I was travelling around the world I made it a mission to be taught to cook traditional meals from each country I visited. While I was in Thailand I did a full day cooking course and learned how to make everything from curry paste to rice and noodle dishes. This dish is thanks to Mama Yaya who took me into her kitchen and taught me some incredible things. Pad Thai has been a favourite for as long as I could remember, and I thought I would give it a go. Thai cooking is full of palm sugar, gluten and various other things disguised as being healthy, so be aware. I modified my version to suit my lifestyle; nutritious, sugar free and gluten free. It tasted just as nice as the original version. You don't have to compromise flavour when cooking healthy. This is proof of that. As all my recipes, feel free to add more or less of everything depending on your preferences. That way you make it your own, special Pad Thai as well.

Pad Thai
Serves 4

Ingredients

4 Shallots, finely chopped
1 Clove Garlic finely chopped
1 Small Red chilli, finely chopped
4 Tbs Sesame Oil (alternatively use Coconut oil - which has proven to increase metabolism)
2 Tbs Fish Sauce
1 Handful Raw Unsalted Peanuts, chopped 
1 Lime
1 Cup Bean Sprouts (fresh & Organic)
1/4 Cup Chives, roughly chopped
1 Tbs Tamarind Paste
1 Cup Chicken, shrimps, tofu, beef (All optional depending on preference and diet)
2 Tbs Agave Syrup (Optional) The Thai kitchen uses 4 tastes, Sweet, Sour, Salty and Spicy. 
Fresh Coriander

Method
Pre soak the noodles 20 mins in water in room temperature. (Read instructions on brand of noodles, but traditional pad thai noodles just need a soak before frying.)
In a wok heat the sesame oil. Add the garlic and shallots and fry till they turn yellow. Add the soy, agave, red chilli, fish sauce, tamarind and prawns, tofu, chicken or beef. Toss frequently then cover the wok and let the flavours infuse and intensify for 4 mins on medium heat. Finally add the soaked noodles, bean sprouts and chives. Toss frequently and cover again under reduced heat. Squeeze juice from 1 lime in.  Serve immediately, with the peanuts, a wedge of lime, fresh chilli and coriander as garnish. 

Enjoy!


Wednesday, 19 February 2014

Quinoa Granola!

I was thinking a few weeks back whilst I was making my roasted quinoa kale and garlic topping for salads, why not do a sweet version? Quinoa Granola. Genius. Then I googled it and realised I was way behind on my inventions and someone had beat me to it. Fine. I will not read or be influenced by any other recipes and make my own version. So tonight I cooked a cup of quinoa which made plenty for dinner and left half for the granola. So I let the remaining quinoa rest and cool in a bowl for an hour. Let me tell you, this turned out amazing. So good, and incredible as dessert, or if you fancy something sweet in the morning. In all honest I could eat it on its own as well. All the time. Everyday. 

Jo's Quinoa Granola

Ingredients

1 1/2 Cup cooked quinoa
1 Handful pecans
2 Tsp Agave ( you can add more or less depending on how sweet you like it)
1/2 Desiccated Coconut
1/2 Tbs Cinnamon

(You can add other nuts / seeds / fruits that you think will go down a treat with this!)

Method

Pre heat your oven to 220 c. Chop the pecans finely. In a mixing bowl combine all the ingredients. On a large roasting tray spread out the quinoa mixture. Roast in the oven for roughly 20- 30 mins. Turn or shake frequently so all the quinoa gets a nice brown colour. 

Let cool and serve with greek yoghurt or if you feel like treating yourself with 3 Tbs Vanilla yoghurt. 

Enjoy! (I know I did!) 


Delicious served in a small pot with Organic Vanilla Yoghurt and a two teaspoons of the granola on top. 

Tuesday, 18 February 2014

Bread and Comfort Gluten Free Style

This is an old recipe that I tried just before Christmas, when I was craving bread and comfort. The recipe is from Sweden, but I modified it as some of the ingredients cannot be found here in the UK. They are so easy to make and perfect to keep in the freezer for the future! Just remember to cut them in half before freezing, otherwise they take forever to reheat and won't fit in the toaster. 

Bread and Comfort Rolls (Gluten Free) 

1 Dl = roughly 1/2 Cup

Ingredients
3 dl Rice Flour 
3 dl Sorghum Flour 
1 dl Corn Starch
2 Tsp Salt
1/2 dl  Psyllium Husk
2 Tbs Potato Starch
50 g Fresh Yeast
7 dl warm (not hot) water
1 egg white
1 Tbs Rapeseed Oil
1/2 dl Light Syrup (brown rice syrup)

Method

Mix all the dry ingredients together in a bowl. Separately combine the yeast to the warm water and dissolve. Add the egg white, syrup, rapseed oil to the yeast and water. Combine the wet ingredients together with the dry ingredients and work the dough well for about 5 mins. After kneading, let the bread rest for 20 mins in the bowl. 

Sprinkle some rice flour onto your baking surface and start forming your rolls however you like them. Always keep a bowl of water next to you when doing this as it can become very sticky. (Downside of working with Gluten Free Flour). Add seed or nuts to your rolls if you like. Alternatively dust flour on top of the plain rolls. 

Let rest under a kitchen towel for another 20 mins. While they rest, pre heat your oven to 220 C. 

Place the rolls in the oven and bake for 20 mins or until they have a golden colour! 

Serve immediately. My guilty pleasure is apricot marmalade with a slice of cheese on warm baked bread. Its a once a month occurrence, but I make sure I only have the best when I indulge. Whats your guilty pleasure to spread on bread? 

Enjoy!


Breakfast to fill you with Energy!

Ever since, I cut out gluten from my diet I immediately felt a difference, less bloated, more energy and my blood sugar levels seemed to remain stabile. I have inherited low blood pressure and with that low blood sugar levels. That is to say when I don't eat after a certain amount of time I don't only get hungry I also change moods very quickly. I notice this gets worse when I have sugar as well so when I cut that out as well I noticed a huge difference in my weight and my mood. Why have I waited so long to do this?? Eat properly.

Better late than never.

Now I am a morning person. I can spring out of bed at 6 am and moan and groan for 5 minutes and then have a jog in the park. This is because I am not a night person and fall sleep at 10 pm. Ha!

Naturally, breakfast is something I have learned to love. The first meal. I usually don't like to cook too much so I stick to Greek yoghurt, but if you are lactose sensitive, I have a another good one for you!

Jo's Power Breakfast - this will keep you going till Lunch

Ingredients

100 g greek yoghurt (or less)
1 Tbs chia seeds
10 raspberries - cut in halves
A few Blueberries
Favourite Gluten Free Muesli - I am going to make my own this weekend but I use Nairns Muesli which is amazing! Rolled Oats work but make sure they are NOT contaminated with Gluten (it will say on the back of the pack)

Method

Mix the Chia in with the yoghurt and let sit for at least 10 mins. The more the better as they swell, and thats how to activate them. Then just mix the rest of the muesli in and add the fruit. Naturally you can use any fruit you have! The trick is to eat as slowly as possible. Sounds utterly ridiculous but if you are the type that rushes breakfast, stop! Every meal should be eaten oven a 30 min period. The more you chew the more nutrients are released. Rather mix the chia and yoghurt the night before if you can.

Muesli, cup of hot water and lemon and my Beauty Food Drink and you are set!


Here is an option for Lactose Intolerant people and something I am new to myself.

Chia Porridge

2 Tbs Chia Seeds
1 Cup Almond/Rice/Oat Milk

Just combine the two the night before and refrigerate! Enjoy with any fruit you have at home. I like it with half a banana. Its that easy and that good. The Chia forms a sort of jelly like consistency, but if you can get over that I recommend it. This is brimmed to the top of fibre, and omega 3 content. Who knew!?


Good Morning Everyone!


Herb crusted Salmon with green goddess salad!

Let me share with you the most delicious recipe for salad dressing. I found it in Palthrow's book, Its All Good, yet I modified it slightly so I take no credit for it. Its called Green Goddess Dressing. Maybe I should rename my version to Green Queen Goddess Dressing? Anyhow, just try it. I served herb crusted salmon with goddess salad last night. Fantastic if I may say so.

Herb Crusted Salmon with Goddess Salad

Serves 4 

Ingredients
For the Salmon:

4 Thin Salmon Fillets (organic)
3 Tbs Rapeseed Oil
4 Tbs Herbs de Provence/ Favorite herb mix.( I love the Dean & Deluca Herbs for fish)

Green Salad

1 Large head of Romaine Salad
6 Sun dried Tomatoes
1 Avocado
1/2 Cucumber (peeled)

Green Queen Goddess Dressing

1 handful basil leaves (fresh) 
2 Spring onions
5 Stems of Fresh Coriander
5 Stems of Fresh Parsley
Leaves from 1 Spring of Fresh Tarragon 
Handful fresh Kale
1 Ripe Avocado
1/4 Cup Veganaise (egg free mayo)
1 1/2 Tbs Raw Honey
Juice from 1 large lemon
2 Tbs White Wine Vinegar (can be substituted for Apple Cider Vinegar)
2 Tbs Extra Virgin Olive Oil
1/4 Cup Filtered Water
Pinch of Maldon Salt & Ground pepper

Method 

Pre heat your oven to 200 C and place the Salmon in an oven proof dish and drizzle over the fillets. Pinch the herbs across the top of the fish and drizzle the rest of the oil over the herbs. Set aside and place in oven when it is at the right temperature. Do not add any salt. 

Chop the romaine, tomatoes, avocado and cucumber into cubes. Toss it together in a large bowl. 

Put the salmon in the oven for 15 mins. 

For the dressing add all the ingredients to a Vitamix or alternative powerful blender. Blend till smooth. 

Add 3 - 4 Tbs of dressing to the salad and toss frequently making the whole salad coated. Serve immediately with the salmon. 

Trust me this is delicious and the dressing will pump up any boring salad you have. 

Enjoy!


Monday, 17 February 2014

Energy Packed Lunch!

As lunch comes creeping round the corner, how is easy would it be just to grab a sandwich, or pre packaged salad and just keep going.. Snacking all day to get through to dinner. Wrong, but well all know that yet we keep doing it. Vicious cycle. Break it! You need to balance out your blood sugar levels in order to be happier and more harmonious person as well as keep your stamina up. Doesn't matter if you do physical work or office work, we all need the same energy to get through the day. These are fantastically simple to make, and easily made the night before and can be eaten the day after for lunch. These are not dairy free but they are gluten free. 

Power Lunch Baked Eggplant 

Serves 4

Ingredients
2 Large Eggplants
1 Red Onion
1 Garlic Clove
Rapeseed Oil
Salt & Ground Pepper
1 Buffalo Mozarella / Feta Cheese
6 Cherry Tomatoes
1 Tbs Tomato Paste (Organic)
3 Spring Onions
2 Tbs Vinegar (Use whichever one you prefer. Apple Cider Vinegar is gluten free)

Method
Pre-heat your oven to 200 C.
Rinse the Eggplants throughly and remove the tops and ends. Cut them lengthwise and rub salt onto them and let them sweat for 15 -20 mins. This removes the excess moisture and some of the bitterness. Wipe off the moisture with a kitchen towel. Drizzle oil on them and place them in an oven proof dish. Add salt and pepper to them and bake for roughly 25 - 30 mins, or until soft. 

In a pan gently heat chopped red onion and the garlic. Once softened add the tomato paste, and vinegar. Let simmer for about 5 mins and finally add the chopped up cherry tomatoes. Keep it under low heat for a further 10 mins. 

Remove the eggplants from the oven and spoon the onion and tomato mixture evenly on to each one. Add the cheese and spring onions last and return to the oven. 

Crank up the oven to grill and let cook for a further 10 mins, or depending on the effectiveness of your oven, till they gets some color. 

Serve immediately. These can be served with a salad, preferably rocket or simply on their own. 

Enjoy! 


Happy Hummus!

Good Morning! Happy Monday and hope you all have a great start to the week. This morning I woke up and started my Elimination Week. What is this? Well, after weeks of late nights, more than enough wine, and amazing food I decided to start eliminating certain foods from my diet this week. Which means, no meat. Only fish and vegetables. I would love to try a vegan week but I need a little more know - how to be able to pull it off and stay sane. 

As I was planning my meals, I plan two days at a time. (Sitting down planning an entire weeks worth of meals just seems uninspiring and tedious. Rather just take it as it comes and see what I feel like rather than for the sake of it.) I flicked through some old recipes and decided to try and make my all time favourite. Hummus. How I love my vitamix and the wonders it can blend to. However, I got carried away and pureed rather than blended. The taste is fantastic though so in the fridge for a few hours to set and it will be super for snacking on. Never again store bought. Super easy and will try a few alternatives soon! 

Happy Hummus

Ingredients

1 can of Chickpeas (I use Mister Organic
1 1/2 Tbs Tahini 
Juice from 1/2 Lemon
2 Small Garlic cloves
120 ml Water.

Method

Rinse the chickpeas and drain them. Rinse and drain till water runs clear. Place the chickpeas in a blender with the garlic cloves,  lemon juice, tahini and water. Switch on your blender and pulse. That way you get a lovely chunky consistency. If you like it creamier, blend for 15 seconds.

Place in a bowl and garnish with parsley. I like my hummus chilled so place it in the fridge for at least 4 hours. 

Enjoy! 


Wednesday, 12 February 2014

Spinach Salad with Roasted Chickpeas

Chickpeas. Yummy Yummy Chickpeas. But like every other thing I seem to like I roast these babies! These little wonders are absolutely incredible in salads and give a little crunch and are perfect for vegetarians who would like to spice up their lives! 

The recipe is so simple. All you do is drain and triple rinse a can of Chickpeas, then add them to a bowl and season them however you wish! I spiced mine with cayenne pepper, garlic power, salt and pepper and chilli powder, and a dash of rapseed oil. Pop them on a roasting tray and under the grill in the oven for about 10 mins. Make sure to give them a good shake now and then! Pull them out once they look like they have some colour and let cool! Then add them to salads, or on their own accompanied with fish, meat or chicken! Yum. 

Enjoy! 


Monday, 10 February 2014

Incredible Flourless Wrap

I am completely and utterly smitten with anything that comes in a wrap. Don't ask me why, I just love it. However, I am not a huge fan of flour wraps and when this idea came across my cooking spot I had to try it! What would you say if I told you, wraps made with egg. Only eggs. No milk, no butter, no flour. Nada. Just plain and simple egg... Genius. Let me tell you it truly is, and very very tasty. Try these for a brunch, or perhaps for a lunch time snack. You get your protein and depending on what you fill it with hopefully some fibre as well. Honestly, you can even team them with fruit if you want an alternative pancake idea. Like I said, Genius. 

Dead Simple Egg Wraps

Use as many eggs as per person. I used 3 eggs for 2 people, but depending on the size of your pan and how big you want them aim for 1 1/2 egg per person. Beat the eggs till they are combined, no chunks of yolk and white. 

Heat up a non stick pan (this is important!) I added a teensy bit of coconut oil to the frying pan and then spooned over the egg mixture. Now. Listen carefully. Make sure the pan is hot. Add the egg and swirl it around so it covers the entire pan. Add more mixture should you need it. Using a spatula carefully lift the egg wrap from the pan once it looks ready and put it on a cutting board and fill it immediately with desired ingredient. For a brunch version I tried smoked salmon, parsley, lemon and spinach and for a lunch version I tried pesto, avocado, tomato and lambs lettuce. So good. 

Serve immediately. 

Enjoy!


Friday, 7 February 2014

Lean Frittata Deluxe

This morning was one of those mornings when I looked in the fridge and found nothing. But funny when you have been stripped to the bare minimum there are always eggs left. So I decided to use all the left over veggies and eggs and create this divine frittata. Oh so easy yet oh so filling!

Lean frittata deluxe
Serves 2

Ingredients

4 organic eggs
All the leftover vegetables you can find! Finely chopped! 

Method 

Pre heat your oven to 200 c
In a mid size frying pan, heat up some coconut oil. Whisk the eggs together until combined and add your vegetables. Pour the mixture into the frying pan keep on heat for roughly 3 mins, then place the pan in the oven and wait till it rises and looks set in the middle. Serve immediately! 

Sooooooo good! 

Enjoy! 


Thursday, 30 January 2014

Chopped Layered Salad

Here is a fantastic recipe for a salad which sits well in the fridge for a few days and is jam packed with taste and nutrients. I have no dressing for this one as just some cold pressed olive oil and a dash of apple cider vinegar is more than enough.

Chopped Layered Happiness in a Salad!

Now the trick is to use any old ingredients you have lying around in the fridge that you want to get rid of. The idea is to use your creative side as well. Here was the one I did. 

Ingredients (Obviously vary depending on your preferences)

Pre-roasted Chicken ( I had some left over from the night before)
Handful cherry tomatoes halved
3 Celery Sticks diced
4 Carrots Peeled and diced
Fresh Parsley
1 Red onion diced
Salad of your choice or Kale

Method

Start by adding the chicken in the bottom, the heaviest, then add the diced carrots, followed by the celery and tomatoes and onion. Make sure there is a clear layer happening before you add another ingredient. Above the vegetables add the parsley as a thin layer and last add the salad or kale. Try to avoid the temptation to toss it. 

Serve it as it is, and instruct your guests to go from the bottom and lift up. You will be surprised how lovely and perfect it comes out. 

By adding fresh herbs to your salad, especially parsley you are investing in your health. Did you know Parsley contains apigenin in which early research has found has helped inhibit the creation of new blood vessels to feed tumours, in particular breast tumours.

Enjoy!


Crunchy Quinoa Topping

I was given this tip from a very good friend of mine, Tracy. We were having a lovely dinner at Otto (Gluten free pizza in London) in November and she mentioned this is a great alternative to croutons and if you like something crunchy in your salad or soup. So I let the idea settle in, and just before Christmas I tried it and it was amazing! This little batch has lasted me a month and it still is good to go. Fantastic way to jazz up your salad and increase the nutritional value! I tossed together whatever I had lying around, so feel free to use your imagination. 

Enjoy!

Crunchy Quinoa Topping

Ingredients

1 Cup Cooked Quinoa
Handful of Kale Leaves
Handful Pine nuts
1 Crushed Garlic Clove
Salt
Chili powder
Pepper

Method

Deadly simple as all you do is mix the ingredients together in a bowl and then line a roasting tray with baking parchment and roast in the oven till it becomes crispy. I had my oven on 250 C and roasted it for roughly 15 mins. But my oven is old and the temperature is sometimes not completely accurate. So stick to your own guidelines! Let cool and then place in an airtight container. 

Simply sprinkle on salads or in soups when you want to add a little crunch to your food.