Showing posts with label Lunch. Show all posts

Friday, 23 May 2014

Tart bursting with flavour and nutrition! MUST TRY!

I have the PERFECT recipe for you. This is it, look no further. I have found the holy grail of flour less quiche and boy is it delicious ( thanks to Honestly Healthy!!) Not only delicious but can easily be altered to be completely vegan, gluten free and paleo. Um hello! Winning. So after a long time I have decided to share this secret with you. It is perfect if you want to impress someone, have people over or make for a picnic! Just do it! the best part of it is that it is sooooo super easy. Stupidly simple. 

Enjoy this recipe and please please please feel free to share the love!

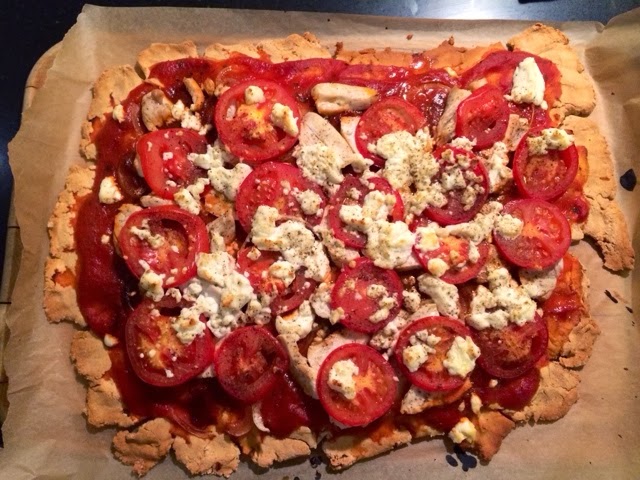
Incredible, Delicious, Mouthwatering Summer Tart!

Ingredients

Crust: 

200 g ground almonds (raw)
Handful basil
4 Tbs Sunflower Oil
1/2 tsp Caraway seeds
Himalayan Salt ( to taste )
1 Tbs Water
100 g pumpkin seeds (raw)
50 g Sunflower Seeds (raw)

Marinade:
2 cloves garlic
4 Tbs Sunflower or Rapeseed Oil
1 Tbs fresh Thyme sprigs
Himalayan Salt
Cracked Black Pepper
2 Tbs Vinegar (balsamic or if completely gluten free use apple cider vinegar)

Filling 
400 g Spinach
500 g Tomatoes (I used a mixture of cherry tomatoes and whole large tomatoes)
75 g hard goats cheese (eliminate if vegan.)

Method

Pre heat your oven to 175 C. Line a tart tray/tin with baking parchment. In a blender ( I always use my trusted old vitamix but any other one will do!) add the almonds, basil, sunflower oil, caraway seeds, water and half of the pumpkin seeds. Pulse the mixture till it becomes smooth. Simply turn it on and off till it is all combined. Add the rest of the seeds and gently pulse for a few time just so you keep the texture of the nuts a little rougher. 

Press the mixture into the baking parchment in the tin. This will make the crust. Make sure it is evenly pressed and comes up the edges properly. Use your fingers and be as precise as you can. Place in the oven for 25 -35 mins or until it becomes golden!

In the meantime quarter your four large tomatoes and halve the cherry tomatoes. make sure you use premium tomatoes! The sweeter and juicier they are the better the tart will be!!Chop the garlic finely. In a big bowl combine the ingredients for the marinade and place the tomatoes in the marinade. Place the dressed tomatoes and marinade in the oven and roast the tomatoes for 10 mins in the oven. 

While the tomatoes are in the oven, take the spinach and place it in a cauldron. Bring a kettle to boil and pour over the spinach and let drain off. pour cold water after and then squeeze out the remaining moisture using your hands or paper towels. Chop the spinach finely and drizzle gently with olive oil. 

Remove the crust from the oven and press the spinach at the base of the tart and add the tomatoes on the top. Sprinkle with grated goats cheese (tofu if vegan or nothing at all) and garnish with thyme or basil! 

Place in the oven for 20 mins and serve immediately or let cool and have later! Either way its absolutely amazing!

Enjoy!


Monday, 5 May 2014

Clean Mango Salsa

Seeing as it is bbq season creeping up upon us here in Europe with the warmer weather finally arriving I thought I would share one of my favourite salsas. This is super simple, yet delicate and delicious. If you have something spicy then this is perfect to balance the spice out. I paired it with BBQ Cajun Spiced chicken thighs and homemade guacamole and steamed corn on the cob. Perfectly filling and nutritious!

Clean Mango Salsa

1 ripe mango
1 small red onion
5 springs curly parsley (or coriander)
3 large tomatoes, seeds removed
1 Tbs Sunflower Oil
1/2 Tbs Vinegar, Apple Cider
2 Pinches Himalayan Salt (High in Minerals and excellent to use!)

Method

Simply chop the mango, tomatoes, and red onion into small pieces. The finer the better. Make sure they are all roughly the same. Combine and add the oil, vinegar and salt. Chop the herbs and stir in gently. Let sit aside for roughly an hour and serve with choice of mains. 

This is fantastic with anything spicy. Specially spicy seared tuna! Yum!


Enjoy 


Clean Mango Salsa

Serving suggestion. Grilled Cajun Chicken, Steamed Corn with Himalayan Salt, Guacamole

Tuesday, 22 April 2014

Nutty Quinoa Power Lunch!


Hello all! 

So sorry for the silence for the past couple of weeks. I have got a new job and with that some hours that take some getting used to. So my precious kitchen hours have been put on hold, but its all for the greater cause of being able to make a living, right!?

Anyhow, I have snuck in a few hours finding some yummy things for you all to try. This for example is my nutty quinoa and vegetable salad. So good, so gluten & dairy free and so vegan! I hope you all enjoy! 

Ingredients

1 cup cooked quinoa (white, red or black)
1 large broccoli
2 carrots
1 zucchini
1 pack green beans
1 handful brazil nuts
1 handful walnuts
1 handful pecan nuts
2 Tbs chia
3 Tbs black sesame seeds

Dressing 

1/3 cup Olive Oil
5 Tbs Tamari Soy
2 Squeezes of Agave (to taste)
1 cm of fresh ginger grated
3 Tbs Rice Vinegar

Method

Chop the raw (washed and dried) broccoli, carrots and (peeled) zucchini into small cubes. Steam the beans for a few minutes then immediately pour cold water on them and chop them into smaller pieces with the other vegetables. Feel free to add whatever veggies you have lying around your fridge. Add the vegetables to a large bowl and add the quinoa. Chop the nuts finely or add them to your Vitamix or blender and blitz quickly till they are in smaller pieces. Add them to the quinoa and vegetables. Last drizzle the chia and sesame seeds on the mixture. 

In a separate bowl add all the dressing ingredients. Be careful here and add as much as you like depending on your own taste and preferences. I adore ginger so I tend to use a lot of it. The agave is just to balance it all out. However, skip it entirely should you be on a no sugar / sweet diet. 

Note: I use no salt in this recipe and if you want to, then try and stick to himalayan salt it contains minerals and has health benefits. 

Add the dressing to the quinoa and place in the fridge for 2 hours. Serve on its own or with salmon! 

Enjoy x


Monday, 3 March 2014

Delicious Quick And Simple Lunch Pasta

Lunch during the weekdays are usually forgotten or rushed. It's rather simple. Plan ahead. The night before just make a double batch for dinner, and save the leftovers for lunch. It's rather anti-social eating leftovers at your desk everyday but if you aim to eat homemade twice a week thats better than the processed sandwiches, salads and other food stuff you tend to grab in a hurry. This is a delicious recipe, so simple and so lovely. It even tastes better the day after. 

Enjoy!

Ingredients:

Serves 1 -2 

1 Zucchini, Finely chopped
1 Carrot, Finely chopped
1/2 Red Onion
Handful Chopped Chives
Himalayan Pink Salt ( to taste )
25 g Goats Cheese

Optional: Parmesan to Garnish.

Method:

Lightly heat the coconut oil in a large frying pan. Add the carrots, zucchini and onion. Cook till soft, and add the chives, vinegar and crumble in the goats cheese. Let sit for a few minutes on low heat. Stir occasionally. 

Bring a pan of water to boil and cook the pasta for 8 mins. Drain and rinse well. 

No oil needed, just add the vegetables to the pasta and serve immediately. Add Parmesan should you wish. 

Alternatively you can use quinoa instead of pasta if you are avoiding starch-rich foods. Brown Rice Pasta is a great alternative to ordinary wheat pasta, it doesn't leave you feeling heavy and bloated afterwards. However, with everything, if you eat too much even gluten free pasta, will make you feel bloated so watch your portions and ingredients carefully. 


a little bowl of heavenly simple pasta


Saturday, 1 March 2014

Gluten Free Pizza. Just because. And just because its so good!

Happy Weekend all my lovely green leaners!
I hope everyone has had a great week, I know I have! Full of energy and happiness. I am sharing a lovely recipe today. Pizza. The source of life! Yumazing. What better comfort food than this? Like all my recipes, feel free to adjust and tweak as you feel would suit your diet better! 


Ingredients

1 dl = Roughly 1/2 Cup.

2 dl Soy Flour
2 dl Rice Flour
2 dl Potato Flour
1/2 dl Psyllium Husks
1 Tsp Salt ( Preferably Himalayan Pink Salt)
42 g Fresh Yeast
50 g Room Temperature Butter
3 1/2 dl Water

Method

Combine all the dry ingredients and add the water, yeast and butter. Knead for a few minutes, till dough like. Let it rest in the bowl for 30 mins. 

Pre heat your oven to 250 C. Place a baking tray in the oven and heat. 

Part the dough and shape into pizzas. Chose your thickness, or thinness. Add preferable toppings. Brush the baking tray quickly with coconut oil, before placing the pizzas. Place in the oven for 10-15 mins or until the crust is golden and toppings are cooked. 

Enjoy!


Monday, 17 February 2014

Energy Packed Lunch!

As lunch comes creeping round the corner, how is easy would it be just to grab a sandwich, or pre packaged salad and just keep going.. Snacking all day to get through to dinner. Wrong, but well all know that yet we keep doing it. Vicious cycle. Break it! You need to balance out your blood sugar levels in order to be happier and more harmonious person as well as keep your stamina up. Doesn't matter if you do physical work or office work, we all need the same energy to get through the day. These are fantastically simple to make, and easily made the night before and can be eaten the day after for lunch. These are not dairy free but they are gluten free. 

Power Lunch Baked Eggplant 

Serves 4

Ingredients
2 Large Eggplants
1 Red Onion
1 Garlic Clove
Rapeseed Oil
Salt & Ground Pepper
1 Buffalo Mozarella / Feta Cheese
6 Cherry Tomatoes
1 Tbs Tomato Paste (Organic)
3 Spring Onions
2 Tbs Vinegar (Use whichever one you prefer. Apple Cider Vinegar is gluten free)

Method
Pre-heat your oven to 200 C.
Rinse the Eggplants throughly and remove the tops and ends. Cut them lengthwise and rub salt onto them and let them sweat for 15 -20 mins. This removes the excess moisture and some of the bitterness. Wipe off the moisture with a kitchen towel. Drizzle oil on them and place them in an oven proof dish. Add salt and pepper to them and bake for roughly 25 - 30 mins, or until soft. 

In a pan gently heat chopped red onion and the garlic. Once softened add the tomato paste, and vinegar. Let simmer for about 5 mins and finally add the chopped up cherry tomatoes. Keep it under low heat for a further 10 mins. 

Remove the eggplants from the oven and spoon the onion and tomato mixture evenly on to each one. Add the cheese and spring onions last and return to the oven. 

Crank up the oven to grill and let cook for a further 10 mins, or depending on the effectiveness of your oven, till they gets some color. 

Serve immediately. These can be served with a salad, preferably rocket or simply on their own. 

Enjoy! 


Happy Hummus!

Good Morning! Happy Monday and hope you all have a great start to the week. This morning I woke up and started my Elimination Week. What is this? Well, after weeks of late nights, more than enough wine, and amazing food I decided to start eliminating certain foods from my diet this week. Which means, no meat. Only fish and vegetables. I would love to try a vegan week but I need a little more know - how to be able to pull it off and stay sane. 

As I was planning my meals, I plan two days at a time. (Sitting down planning an entire weeks worth of meals just seems uninspiring and tedious. Rather just take it as it comes and see what I feel like rather than for the sake of it.) I flicked through some old recipes and decided to try and make my all time favourite. Hummus. How I love my vitamix and the wonders it can blend to. However, I got carried away and pureed rather than blended. The taste is fantastic though so in the fridge for a few hours to set and it will be super for snacking on. Never again store bought. Super easy and will try a few alternatives soon! 

Happy Hummus

Ingredients

1 can of Chickpeas (I use Mister Organic
1 1/2 Tbs Tahini 
Juice from 1/2 Lemon
2 Small Garlic cloves
120 ml Water.

Method

Rinse the chickpeas and drain them. Rinse and drain till water runs clear. Place the chickpeas in a blender with the garlic cloves,  lemon juice, tahini and water. Switch on your blender and pulse. That way you get a lovely chunky consistency. If you like it creamier, blend for 15 seconds.

Place in a bowl and garnish with parsley. I like my hummus chilled so place it in the fridge for at least 4 hours. 

Enjoy! 


Monday, 10 February 2014

Incredible Flourless Wrap

I am completely and utterly smitten with anything that comes in a wrap. Don't ask me why, I just love it. However, I am not a huge fan of flour wraps and when this idea came across my cooking spot I had to try it! What would you say if I told you, wraps made with egg. Only eggs. No milk, no butter, no flour. Nada. Just plain and simple egg... Genius. Let me tell you it truly is, and very very tasty. Try these for a brunch, or perhaps for a lunch time snack. You get your protein and depending on what you fill it with hopefully some fibre as well. Honestly, you can even team them with fruit if you want an alternative pancake idea. Like I said, Genius. 

Dead Simple Egg Wraps

Use as many eggs as per person. I used 3 eggs for 2 people, but depending on the size of your pan and how big you want them aim for 1 1/2 egg per person. Beat the eggs till they are combined, no chunks of yolk and white. 

Heat up a non stick pan (this is important!) I added a teensy bit of coconut oil to the frying pan and then spooned over the egg mixture. Now. Listen carefully. Make sure the pan is hot. Add the egg and swirl it around so it covers the entire pan. Add more mixture should you need it. Using a spatula carefully lift the egg wrap from the pan once it looks ready and put it on a cutting board and fill it immediately with desired ingredient. For a brunch version I tried smoked salmon, parsley, lemon and spinach and for a lunch version I tried pesto, avocado, tomato and lambs lettuce. So good. 

Serve immediately. 

Enjoy!


Saturday, 12 October 2013

Quinoa and Chickpeas

Looking for some super easy lunch ideas that you can quickly throw together and everyone likes? Try these... oh and did I mention they are healthy and nutrient packed?

Quinoa Bites
 Ingredients

2 cups Cooked quinoa
6 Basil Leaves
1 cup Cherry tomatoes
Half a Red Pepper
100 g Shredded Mozarella ( Goats Cheese or Tofu)
2 Pressed Garlic Cloves
1 Red Onion Finely chopped.
1 Tsp cayenne Pepper
1 Tsp Chilli Powder
Salt & Pepper to taste.
2 Organic Eggs


Preheat your oven to 400 F or 200 C
Combine all the ingredients in a bowl and mix with a large spoon. Feel free to add or substitute any of the other ingredients to taste! Mine are just a guideline, no need to follow exactly! Press the quinoa mixture into muffin trays. I filled them halfway! Pop in the oven until they have a brown crust. I added Parmesan at the final 5 mins of cooking but this is optional.

Serve after a few mins cooling. You can dip them in tomato sauce, or eat them on their own! Perfect to have at home to snack on.

Quinoa bites, who doesn't love quinoa?

Chickpea Salad

Serves 4

Ingredients
1 can Chickpeas (preferably Organic)
1 red Onion (or Scallions)
100 g Feta
4 Tomatoes
2 Tbs Neutral Oil
1 Tbs Apple Cider Vinegar ( Gluten free Vinegar)
Pepper to taste
Garnish with either chopped Mint, Parsely or Coriander depending on which you prefer. The Mint is excellent for summer days. 

Drain the chickpeas from the can and wash over a few times until they are throughly washed and place them in a strainer to drip off the last of the water. Slice the red onion thinly and quarter the tomatoes. Crumble the feta in and add the chickpeas. Pour on the oil and vinegar and a few churns of pepper. Serve immediately. 

I usually make this in a big bowl and then leave the rest in the fridge, is perfectly fresh up to 2 -3 days, if kept in a metal bowl. 


Enjoy!